Sunday 4 December 2016

Lyceum Theatre Flamingo Puppets


Shortly after returning from a trip to Beijing to see my brother (partly why there hasn't been too many posts recently!) I was commissioned to help Vision Mechanics make some puppets for the Edinburgh Lyceum's Christmas show, Alice in Wonderland.  I was overjoyed and somewhat nervous - this would be the first time I'd be paid for my work. The prospect, while helping to boost my confidence and validate (in my mind at least) my title as a "Prop Maker"- also brought feelings of fear and apprehension. The responsibility that comes with a paid job most certainty exceeds that of any  internship I've taken on. Your employers are relying on you to deliver the project on budget and to a high standard, this - when you add the pressure of a deadline can lead to high amounts of stress. Imposter-sydrome is something I think anyone deals with (even Adam Savage says he experiences it on a daily basis, listen to the podcast where he talks about the very subject here!
 "I don't know what the hell I'm doing, why am I even trying!?" "There's a million other people out there who are so much better than I, what makes ME so special?"
These are thoughts that enter my brain on a daily basis, and this job helped to draw out these insecurities even more.

Having said all this, when those thoughts have been dealt with (which definitely has to be a proactive, conscious effort) I can start to enjoy what I love doing - making things with my bare hands, solving problems, bringing an idea, an intangible quantity into the physical world.
An idea, a crazy idea I had as a young kids is starting to become a reality - the road is yet long, bumpy and hilly (throw in a couple of sea-crossing for good measure) but as a wise wizard once said:

"It's a dangerous business walking out of one's front door" but "Home is now behind you, the world is ahead!"

Any who-de-doody, onto the puppet build!

So there are three flamingos in the play which are used to play croquet, check out this clip of the flamingos in Disney's Alice in Wonderland. The design breif was:

The Flamingos need to have rigid necks while they're being used as clubs, then flexible necks while they're being used as puppets, the mouth also needs to have a spring mechanism.

Initial Sketch for shape of bird.


I first started with the body. I'd seen Ted Haines use this carving technique in one of the Stan Winston School videos, It's a great way to take away a lot of material and produce the initial shape quickly. I drew the shape of the body from the top and sides onto a polystyrene block. 


I then used a saw to cut out the shape. When the sides were cut out, I taped the off-cuts back to the initial block so I could cut the top shape. 


I then sanded the shape until it was nice and smooth and no flat surfaces were left. The polystyrene body was used as a form to shape varafrom (thermoplastic) on top of. This was because the body needed to be hollow, we also needed three identical flamingos so this would ensure that each body would be exactly the shame shape. 


Here is my initial drawing of the mouth mech. We found a great video on youtube about how to make a very cheap and simple spring mouth mechanism which I used to help design my one. 


The heads needed to be round so I used polystyrene balls for the initial shape, however polystyrene isn't particularly structurally reliable. I needed to have a solid piece of material inside the polystyrene head which I could attach the mouth mechanism to.  In solution to this problem I carved out a channel straight though the center of the ball and inserted a block of wood in the hollow. 

Top mouth plate inserted though polystyrene and into wood.

The beak was going to be made from foam, so I  needed to make a pattern. I built up the shape I wanted with foil and masking tape, then covered this with duct tape. The beak is symmetrical so I only needed to create one side of the pattern.

Once the duct tape was removed from the from, I flattened it out (cutting the necessary darts so the shape would be retained when transferred to foam). 

Here is the pattern transferred to foam and glued together. I cut a channel along the bottom so the foam could be stuck to both the side and bottom of the mouth plate. 


Time to explain how I made the magical rigid-to-flexible neck. The flamingos legs are made from two wooden dowels. One of these dowels is permanently fixed to the body, however the other slides up and down the body and neck (Which is made from a flexible, hollow pipe). When the neck needs to be flexible, the leg is in the "down position" and when it needs to be rigid, the actor pushes the dowel up though the body, though the pipe and into the head. There is a hole in the head which is just a tad smaller than the dowel, easy enough for an actor to push it in, but tight enough so it won't fall out.

Here is the neck being attached to the head. 

I then covered this with Milliput epoxy clay to restore the sphere shape. A wooden dowel (ahem, pencil, we were on a tight budget!) was inserted for the actors to use as a handle to control the puppet.


 Mouth Mech working and holes in top and bottom of the head filled in with milliput!

 Now unfortunately this is kinda where time was running out and the deadline was approaching rather fast. In result of this, snapping photos took a back seat. The varafrom body and executing the rigid-flexible neck mechanism were next, I would be lying if I said that all my ideas worked, but I got there in the end! (and just in time for the deadline, phew!)

Here are some pictures of the finished puppets!
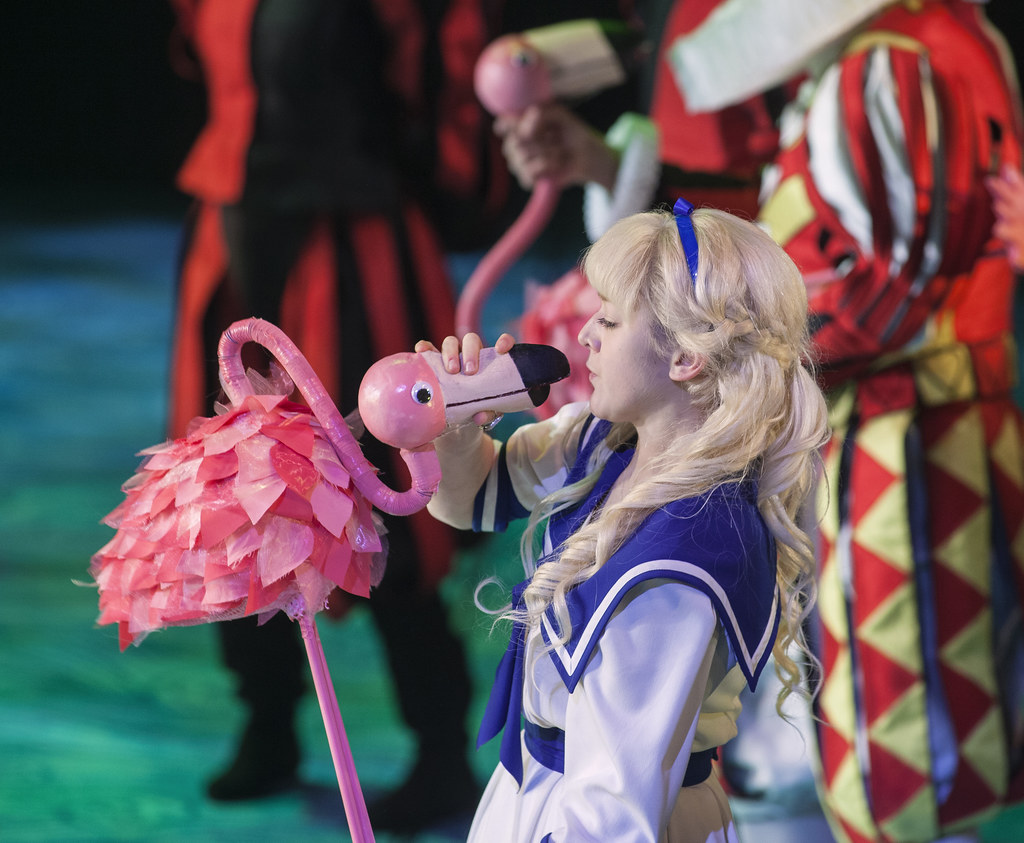


Thanks for reading!
A write-up of a sword-y nature coming soon!


Friday 21 October 2016

Vision Mechanics - Dragon Matrix Work Experience!

During September I was working for Vision Mechanics on their show Dragon Matrix as an Assistant Prop Maker.

Vision Mechanics are one of Scotland's most prestigious theatre production companies and are the creators behind such incredible events as the Big Man Walking, Giants in the forest and Embrace. Dragon Matrix is the first show in Scotland to combine Augmented Reality Technology with live theatre. Set in Monikie County park, the show will bring the forest alive with 3D fairies, trolls, goblins and hovering flies. As well as the incredible 3D creatures visitors will also find many other magical interactive installations throughout the forest including a fairy village, dragon museum, spirit of the dragon, red witch tree and much much more!

I felt very privileged and honored to work with such incredible artists and learnt so much from my experience working with such an established theatre company. During my time as an assistant prop maker I helped to make all the fairy houses for the fairy village instillation. I also helped with creating props for the Dragon Museum and used my electrical knowledge to wire lights for the event.

I was so delighted and exited to work for Vision Mechanics, I gained so much practical experience and there wasn't a day that went by where I wasn't using my hands to make something. As an aspiring prop maker, I couldn't have asked for much more!

Find the show's website here
and watch the trailer for the show here:


Monday 5 September 2016

Jupiter Art Land Work Experience!


During the summer while I was working on many exciting prop building projects (watch this space for the build write ups!) I was also working at Jupiter Art Land as a learning assistant. Inspiring and nurturing creativity in children is something I am very passionate about and before I go to study a BA in Model Effects at university next year I want to spend time developing this passion.
During my time at Jupiter I helped to run the children's art classes and workshops. From making pipe cleaner figures to bug houses to mud pies, helping and watching the children find their inner creativity was a truly inspirational experience!

One thing (which one can't fully appreciate until one has seen it) is the fact that a child's creativity has no limit. They have not experienced enough of the world to know what is and what isn't possible. They are explorers, finding and making new discoveries every day. Children aren't shackled by the rules, regulations, political ideas and social anxieties which prevent adults from truly expressing their creative voices. The raw, unfettered imagination a child possesses is a truly incredible thing to see.


From the wise words of  Pablo Picasso:

Every child is an artist. The problem is how to remain an artist once we grow up.


My experience working at Jupiter Art Land exceeded my expectations. Not only working with the children but also working with the teachers, who's passion and commitment towards their work was truly inspiring.


Saturday 3 September 2016

Drill Lathe!


First of all, what do you think of my face shield? xD 
The army helmet was a prop used in a movie my brother and I made along time ago and the perspex was salvaged from the top of screwdriver set case. Remember, safety never takes a vacation!
So I needed a lathe for one of my next projects however lacking the funds to purchase one, I decided to make my own. I'd had a drill laying around in my shop for quite some time and I finally got to scratch the itch and turn it into something useful! Fortunately it's a corded drill rather than a battery powered one, although the motor will eventually burn out, it will take a lot longer than if it were battery powered. I started with a couple of designs on paper then took to the nets to gather some more ideas. I found a video by Izzy Swan who's video on how to make a cheap lathe was very useful:  https://www.youtube.com/watch?v=zwE_2Owp3fA

I had planned a rather extensive build write-up for this project however the technology gods had other ideas.. my phone broke (I had an LG G4 which has gone into the boot-loop malfunction. Apparently nearly all G4s will encounter the issue at some point. If you've had a similar problem LG are offering a solution, read more about it here) and I lost all my build processes pictures. So unfortunately I won't be able to do a build write up for this project. I have, however made a video showing the lathe in action!

The video shows me trying the lathe out for the very first time and so I'm only really testing to see if everything works properly (making sure the motor has enough torque to continue spinning while I'm applying pressure to the wood ect.) My chisel set is yet to arrive in the post so I had to use an old rusty one I found in our garage.

In the future I would love to buy my own lathe, but for now my "drillathe-o-matic" will serve as a great starting point and suits my current requirements. Overall I'm very happy with the way it turned out and if you too need a lathe and don't have the budget to purchase one, I would definitely recommend giving this little project a go!

Watch the video here:


Saturday 30 July 2016

My escapades into 3D printing and Laser Cutting!

With Digital Manufacturing becoming more and more popular in the prop making world (and many other disciplines) I feel that educating myself in the magical ways of this ever expanding field is essential (I would most certainly be doing myself a great disservice if I didn't). The maker movement is also growing exponentially and maker spaces are popping up all over the place. The MakLab in Glasgow is where my adventures began. The first class I took was in 3D printing, they have many different printers ranging from Ultimakers to a HP Designjet Color 3D Printer! I was struck by the simplicity of the process, of course you have to learn how to model in a certain way in order to produce a perfect print.  However the fact that something which only exited inside a computer can become an physical object you can touch and feel in a matter of hours is something I find truly incredible (and probably will do for a long time).  I already have some knowledge of 3Ds Max which made the modelling process easier for me. We used Fusion 360 in the class which I found to be incredibly user-friendly. I plan to start learning how to use this software as it has some incredible features including a large community of users, an active forum, huge Autodesk tutorial library, free-form modeling tools and it's also a cloud-based platform.

 I have a commission coming up shortly which will have some 3D printed elements. I decided I would practice modeling the item for the commission in the class. The item was going to be printed on an Ultimaker 2, once I'd finished modeling we took the file over to Cura (Software which prepares your 3D model for printing). After the model was deemed ready to print, the file was put on an SD card, inserted into the 3D printer and.... Off it went! Watching that thing go is completely entrancing (half attributed possibly to the lovely fumes of melting plastic).

Here is a video of the printer doing it's thang:


And here is the result: (Not the most splendid example of the capabilities that 3D printing has to offer, but I had fun and learnt a tonne, so that's all that matters ;)

The next class I took was an introduction into laser cutting. The task was to create a laser cut lamp shade from cardboard, this was a perfect project to start on, it was fairly simple, but armed me with the necessary knowledge to allow me to start on my own laser cutting projects. Again, I used fusion 360 to create the model, then transferred these designs to 123D Make which converts the 3D files into a sliced model ready for laser cutting. Again the simplicity of the process was completely incredible and the results are equally amazing- the laser cutter can cut with a precision and speed that I could never, ever achieve with mechanical/hand tools. Once all the pieces had been cut, it was just a matter of matching up all the numbers and gluing the pieces together.

Here is the laser cutting making some lovely smelling burnt cardboard fumes!

And some progress pics:

Here is the lampshade in action! (Sprayed with fire retardant of course ;))

If anyone is looking to get started in the world of digital manufacturing I would thoroughly recommend finding your nearest maker space and taking some classes! Getting started is always the hardest part, but it's worth it - trust me. I will certainly be taking the knowledge I've learnt further and expect to see many 3D printed and laser cut elements in my future projects!


Tuesday 5 July 2016

Dr. Strangelove Survival Kit Camera Case

So I recently watched Dr. Strangelove or: How I Learned to Stop Worrying and Love the Bomb and boy did it live up to my expectations! The Major Kong Survival Kit scene particularly stuck in my mind - especially the survival kit prop! I usually like my props to have some functionality (not just a display piece) so I decided to make a survival kit camera case! Check out the scene here: https://www.youtube.com/watch?v=vPwW7RaPO_g


I had put the camera on a bookshelf to take this last photo with a 10 second timer. This was a terrible idea and it nearly crashed to the floor! This is me rushing to catch it before it fell to it's doom. Fortunately both the camera and my heart made it though.


Onto the build process!

I started out by using my camera/batteries/charger to gauge how big I needed to make the case. Once I had the length/width/depth figured out I used my jigsaw to cut out all the pieces. I used some 4mm hardboard which I had salvaged from an old picture frame for most of the pieces.

Here are all the pieces laid out. The brown stuff is the hardboard then the white stuff is some thicker hardboard I had laying around.

I knew I would be covering all the pieces in fabric and I didn't want the sharp edges cutting into it so I just rounded them all off with sandpaper.

I cut some holes using a drill and my jigsaw for the webbing straps to go though later on.

I wanted the whole case (Not just the inside) to be really spongy so I sandwiched the hardboard inbetween some 5mm upholstery foam. I made the bottom piece of foam larger than the hardboard and also bevel cut all the edges. This will allow me to bend the foam over the edges of the hardboard. The beveled cut will help to blend the seam between the two pieces. 

Here all all the pieces covered in foam. I used some webbing to temporarily hold all the pieces together so I could make sure they all fit.  

Here are the side pieces and bottom piece covered in fabric and ready to be sewed.

I started with the bottom piece. I needed the seams to be on the outside as I'll be using them to attach the bottom piece to the side panels. I also need the seam to be at the bottom (rather than at the middle which is where it would naturally fall) otherwise the side panels would attach to the middle of the bottom piece rather than at the bottom of the bottom piece (Is this making any sense!?)

I had to use a combination of hand sewing and machine sewing to get the results I needed. Hopefully you can see what I was trying to explain. The corners were sewn together and then the excess fabric was cut off. The seam will also be trimmed down to the size I need. 
Getting the piece inside the fabric was quite tricky as the foam doesn't slide along the fabric very well (at all). To remedy this I cut open a plastic zip lock bag so that it was just one strip of plastic. I wrapped the piece inside this strip and then inserted the piece into the fabric. Once the piece was inside the fabric I pulled out the plastic strip.

For the side panel fabric I also needed the seam line to be on the outside. I used my sewing machine to sew a channel for the panel pieces to slide thorough (making sure that the fabric would be tight across the panels). I used the same method for getting all the side panels inside the fabric as above
.

Sewing up the opening..

 Joining the panels together to create a box..

Trimming the seams down and folding them over..

Sewing the bottom piece and side panels together.

For the lid of the case I machine sewed three sides of the fabric, inserted the panel then hand sewed the open end shut. I also needed the seams on the lid to be on the outside as I would use them to sew in the zip.

Here I am sewing the zip to the seam of the lid. The zip was also sewed in to the top seam of the side panels


Remember that hole I made for the straps to go though at the beginning? I cut through the fabric to expose the holes then folded and glued the fabric over to stop it fraying. I then added two pieces of fabric underneath to make the hole look much nicer. 

I threaded the webbing though ( making sure to assemble the adjustable buckle mechanism on the webbing before threading it through) I covered the last 5cm of webbing with copydex then rolled it up to stop it pulling back though the holes. 

I also melted and merged the nylon together to make sure it would't come undone. 

Stencil Time! I Created the text in Photoshop then printed it  out to the correct size. I then spent a good couple of hours cutting out all the letters. Podcasts are your best friends in this situation. I'd recommend: Making It - a podcast by Youtubers Jimmy Diresta, Bob Clagett and David Picciuto. They talk about how they go about making things, how it affects their lives and almost everything in between!
 

Here is the stenciled lettering painted onto the lid! I used acrylic mixed with latex - this will make the paint more flexible and prevent it from cracking off. 

Thank you very much for reading! :)