Hello!
Happy (belated) New Year! I've just finished this commission and I can't wait to share the build process with you guys. I've never made a sword before and so this was all new ground for me. I also wanted to use this project to practice mould making and casting and so incorporated this into the build plan.
First some pictures!


First some pictures!


To begin with, I send all of my clients a build plan, costing sheet, material diagram and scale drawing before I begin to build the commission, check them out below -


...And if you're interested here's a link to a list of where I bought all the items: Click Here
So as you can probably tell I had a pretty good idea of how I was going to make the sword before I started, this would make sure I would stay on Budget and on Time for the client.
( B+T = Two most important rules of prop making)
So after all this planning I finally began to make the blade of the sword.
Blind Squirrel Props is is quite the expert on prop swords and has many awesome build write-ups detailing how he makes them. I really liked the technique he uses to make his blades so decided to use a similar method for mine.
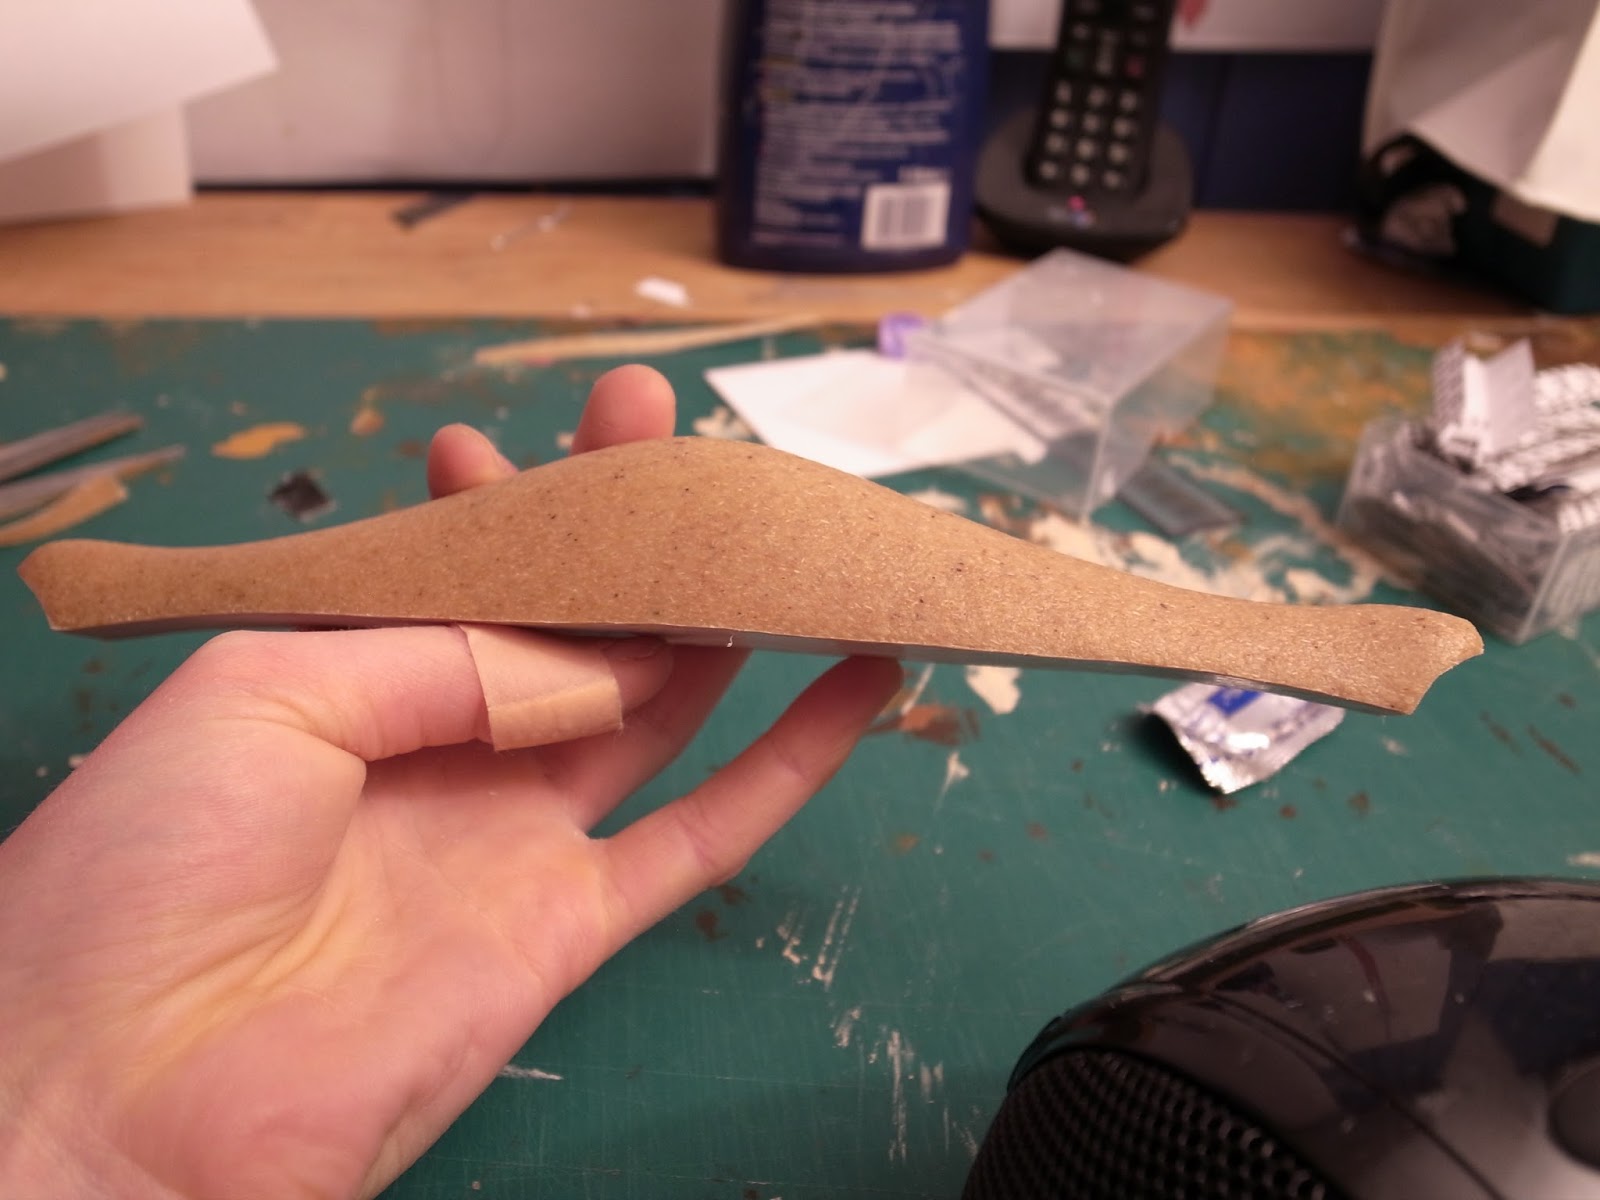
I started with two sheets of pine flooring. I used this material because it's easy to cut (doesn't splinter or crack), easy to sand, strong for it's weight and is also very cheap.
I first drew the blade shape onto the pine strips, then temporally taped them together and cut the shape out with my jigsaw. I then cut a 4mm channel though the center of both strips with a router (stopping about 20cm from the end of the blade).
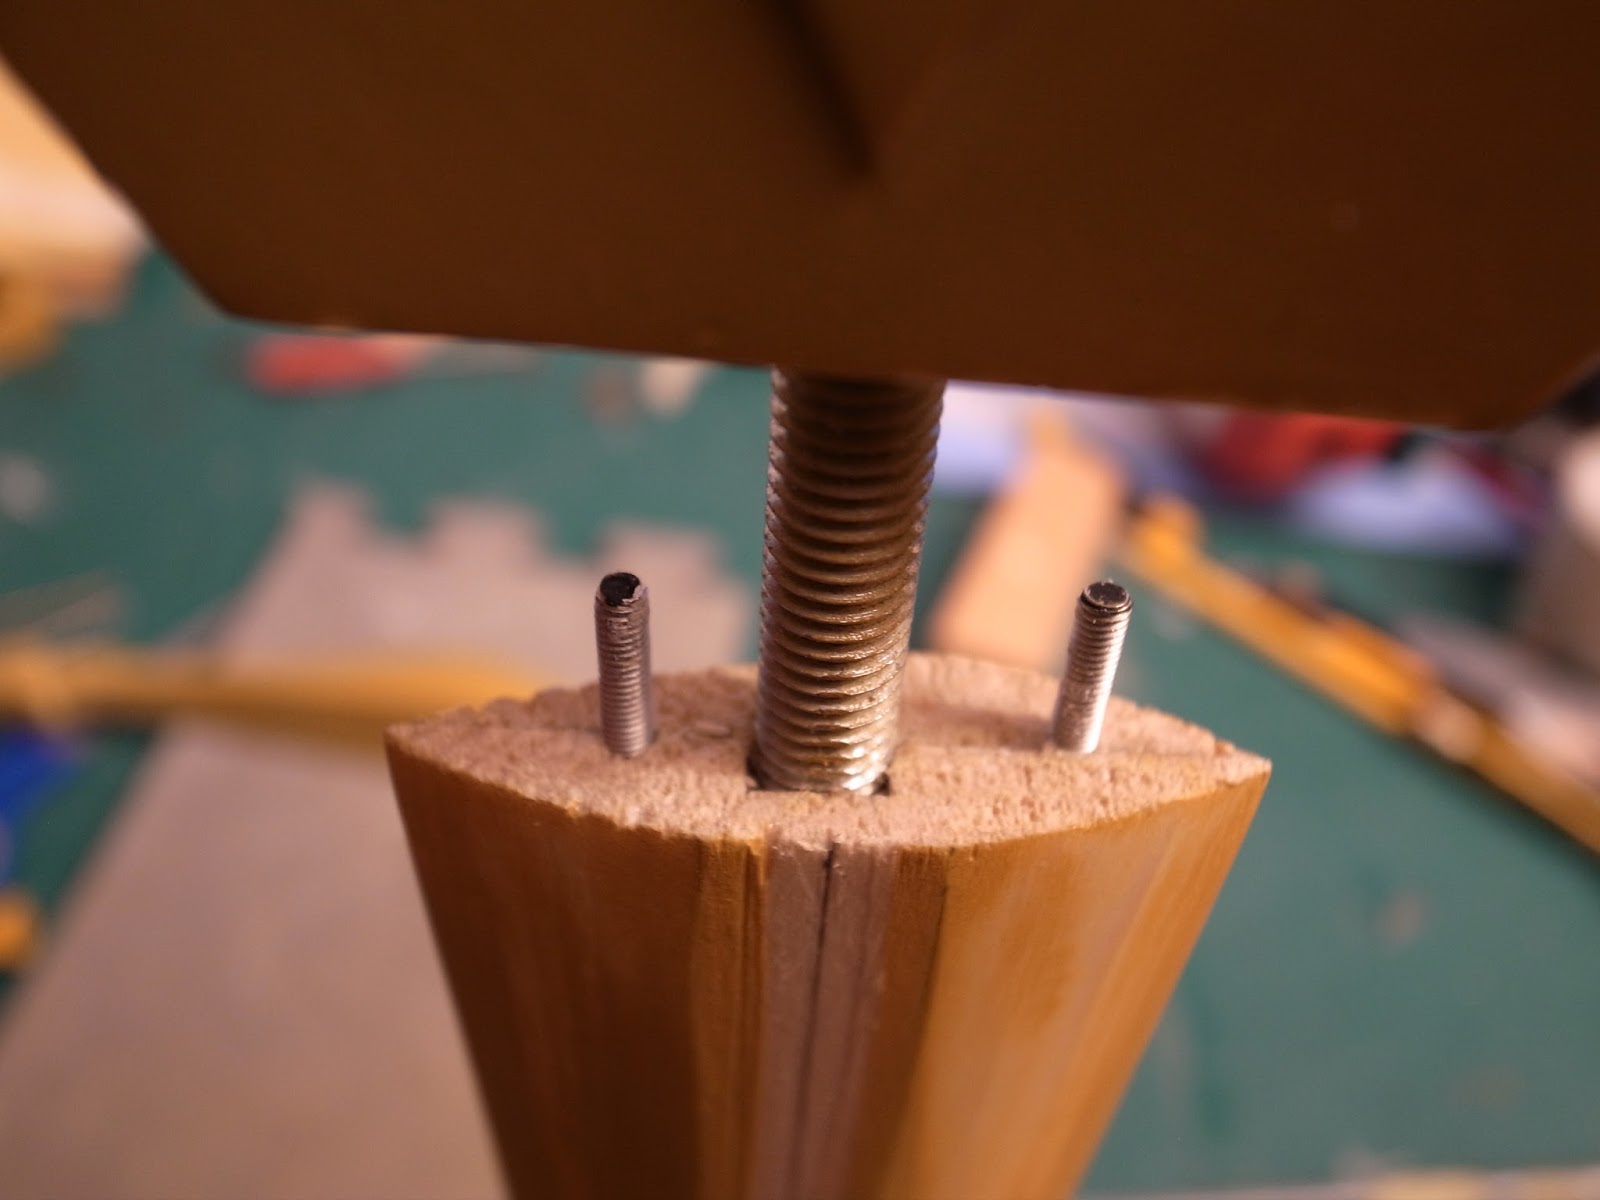
I then glued a 1.44 meter, 8mm threaded rod into the channels, this will make sure the wood will not snap and ensure the blade will be strongly connected to the rest of the sword.
I first roughed up the surface of the steel rod to make a good gluing surface. I then filled the channel with Milliput (epoxy clay) and then pressed the steel rod into the clay.
 |
| My camera's date was set to 2009 - I only just noticed this now though! |
I waited overnight for the milliput to harden then applied epoxy glue to other channel and wood glue to the pine strips. I then clamped the two halves together and waited for them to dry.


The next step was to shape the square blocks of wood into a sharp blade. The edges of the blade as well as the apex needed to be centered. I found the center lines of both the side and top faces of the wood then used gaffer tape to mark these lines.

I then used a chisel to take away the material that wasn't needed. The gaffer tape acted as a guide and prevented the chisel from taking away too much material. You can see a break in the line of tape in this picture, this is because there will be a flat part on the blade for the engraved strip to sit on.

I didn't use the chisel to go all the way to the line, instead I used a sanding block get right to the edges. I gradually used finer and finer sandpaper until the surface was smooth and as close to the line as possible.


Apex centered all the way down the blade.

 |
| See here the flat surface on the blade. This will accommodate the engraved strip. |

The next step was to make the guard. I began by printing out my template and gluing it on to some 15mm MDF with Pritt Stick. I cut out the shape using my hacksaw (I would love a scroll saw to do this kind of work, however this method works just fine.
Power tools are useful items to have and they definitely speed up your work flow, however almost anything can be achieved with a bit of elbow grease, patience and careful thinking.)

The tips of the bottom arches will be sanded to shape rather than cut out with the hacksaw.
I also decided to get rid of the twiddly bits (Techincal term) that are inside the arches as it would be much easier to sculpt them from scratch.

The arches are thicker than the lower shape. I was originally going to use 18mm mdf for the arches and 15mm for the bottom shape however I decided to create the raised detail with styrene. I wasn't too worried about using multiple materials to create the shape as the part is going to be moulded and cast anyway (making strength/paintability not a problem).

I took my time and sanded all the raw edges until smooth and free of any marks left from the hacksaw.

The next thing to do was cut out all the tiny detail pieces. I printed these out on paper and glued them on to some 1mm styrene. I've always found cutting styrene to be tricky, especially small pieces like these. Scoring the plastic multiple times then snapping across the line seems to be the most popular method and it's the one that works best for me. If anyone has any tips I would love to read them in the comment section!

I used a PVC pipe to make the circular detail. The circle needed to be 1mm thick so I measured and marked this on the pipe all the way around (a mark every 2cm or so). I then wrapped tape around the pipe, following the markings. I made light cuts all the way around the pipe until it was cut. Making light cuts all the way around rather than trying to saw all the way though from the top helps to keep the cut straight.


I then glued all the detail down with superglue.


The next step was to sculpt the twiddly bits that go inside the arches, I decided to sculpt these from milliput. I needed two identical twiddly bits so I printed out the template and used this as a guide to sculpt on. I applied milliput to both sides of the template then sculpted the shape until it looked symmetrical.
I'm pretty awful at free hand sculpting (If you've seen the pictures of my creature head sculpt then you'll know what I mean) so the templates helped me a lot.

I let the milliput harden over night then glued them in with superglue (Again, it didn't need to be too strong as I'd be moulding and casting the whole thing anyway.)


Time for priming! I don't have a fume extraction system in my workshop so I used my hall as it's the biggest room in the house. I would have gone outside, however it's too cold at the moment and it would have prevented the paint from curing properly. I made sure to open all the windows/doors once I'd finished spraying to let out all the fumes. I used filler primer as this helps to fill in minor imperfections in the surface and reduces the amount of time spent priming and sanding.
I primed and sanded around 8 times, making the surface as smooth as possible.
Sanding is the worst part of prop making, but unfortunately it's what you end up doing most! Ah well, it beats working in an office.

This is round 3 of filler primer, only 5 left to go!

Now that the surface is nice and smooth I can begin casting!
I'd never used silicone or polyurethane resin before, so this was an exercise for me to learn how. It's a very expensive process so I'll only use it when absolutely necessary next time.
Some great tutorials on Molding and Casting are:
I began by making the clay wall. I rolled out some non-sulfur based clay (don't use clay with sulfur in it otherwise it will stop your silicone curing properly!) I bought some really cheap clay for this and I definitely regret that decision. The clay didn't bind together too well and stuck to everything it touched, it also smeared all over the place and it took a very long time to create a smooth & even clay wall. Newplast Modeling Material is definitely not recommended!
I used foam board strips glued to my work table to roll out an even thickness of clay.

I then cut out a cavity just a little bit smaller than the actual size of the guard. You can see here the outline of the guard shape and the clay that will be removed.

You can see in this picture an extra piece of MDF attached to the bottom of the guard, this will be the pour spout for the polyurethane resin. Another reason why I wanted to mould and cast this part is because I needed there to be a hole all the way though the center of the guard for the threaded rod to go though. This task would have been quite easy with a drill press, but unfortunately I do not own one of these machines. My solution was to place a threaded rod in the center of the mould and cast the resin around it (applying mould release to the steel rod so I could take it out once the resin had cured) This however, did not work - more pictures to show what happened later.
After making the mould wall as neat & smooth as possible I added keys to the clay with the end of a paint brush. You want the keys to be fairly close to the part as this will help the two halves fit back together accurately.


I then made the mould walls with some foam board, sealing up the joins with hot glue. Ya don't want silicone oozing out! It's waaay to expensive for that.
Here's a link to a page I wrote about moulding and casting. I mostly wrote it for my own reference when I was learning how to mould and cast. A lot of the information comes for Bill Doran's video.

The first half of the mould is finished! I cleaned off the residual clay with turpentine (don't go overboard with this stuff as it could stat to degrade your silicone)


Here are the two mould halves! The first one is much darker as I got the mixture slightly wrong (Thankfully it did't stop it curing though, phew!).


I then placed the threaded rod into the mould. I made a styrene jig to hold the rod exactly in the center. I made sure that I would still be able to pour the resin though the jig. I applied lots of mould release to the steel rod, hoping that his would stop the resin bonding to the metal - how wrong was I!


I put the two mould halves together and built an MDF jacket to hold them firmly in place. I tried using elastic bands however this pinched and deformed the mould.

I used hex nuts to fix the jacket together. I would have used wing nuts as they are much easier to screw/unscrew, but didn't have any at the time.

This was the first casting... AAAAAHH!?
After further reading I discovered what you should do about under hangs in a mould. Air gets trapped in these places and prevents the resin from filling up the space. Watch this video to see how to prevent this issue.

I also tried to take out the steel rod which resulted in the mould cracking down the center. I was a little annoyed about the failed cast and so I was impatient and didn't wait for the cast to fully cure before trying to take out the steel rod. If I had waited a little longer, I may have been able to take it out without it cracking, but we shall never know.
Lesson learnt: Don't loose patience and do something stupid! Take a break and come back with a fresh mind. You'll have probably thought of a solution by the time you come back.

..It did kinda make a cool pattern though.

I tried it again, but used a hollow tube rather than a steel rod. This created a hole straight through the casting which I could then use as a guide to drill out further. The hollow tube was from a pen I bought in China. It was a tightly rolled paper tube with a hole going straight thought the middle, strong enough to not warp when I poured in the resin, but easy enough to drill through.
Unfortunately I don't have any pictures of this, but hopefully you get the idea.
Next thing to tackle was the cross-guard. I had planned to slush cast this, but didn't have enough polyurethane resin left over.
I printed out a top and bottom view of the corssguard then glued them onto some 1mm styrene and cut them out with a scalpel. I marked 1cm lines across both templates, starting from the center line. These will mark where the ribs will go.

I glued the two templates together with super glue. This is a picture of a prototype which doesn't have the 1cm marking on the front template. This was revised for ver.2

Here you can see the ribs being attached. The lines helped to keep the ribs at equal distances apart and at 90degree angles. It took a while to get the curved shape of the rib correct, but eventually I arrived at a shape that looked right.


All the ribs finished and ready for next stage.

I then roughly filled the cavities with insulation foam. The foam is just there to fill out the gaps so I won't have to use as much Milliput.


I then began filling in the sections with milliput. Making sure I wasn't going beyond the boundaries of the ribs.


I waited for the Milliput to cure, then sanded the surface until smooth.


In some designs of the sword I saw that the crossguard was hollow, this is why I was planning to slush cast the piece. As said before I didn't have enough resin, so decided to try using some Worbla I had laying around instead. I'd heard so much about the material and wanted to try some for myself.
Some great resources I found about working with the material are:
I began by fusing two layers of worbla together to create a thicker and stronger material. I heated this sheet up and then draped it over the crossguard shape (now being used as a buck). Once it had taken the overall shape I then heated up the sections that needed a bit more persuasion until I was happy with the shape.

I heated up the edges then used my scalpel to trim off the excess material.


I gently prised the worbla off the buck, making sure not to damage either surface. The material is incredibly easy to work with and surprisingly strong. This was my first time using worbla and I'll definitely be using it in the future.


In the end however, I didn't like how the hollow crossguard looked and decided to go with the solid version instead!
Next I made the twidley bits that sit on the end of the crossguard. Again, I printed the template on card then sculpted around the card.

I glued the larger and smaller pieces together then drilled a hole though both and inserted a 2mm threaded rod. I drilled a small hole in both ends of the crossguard then screwed/epoxied the twiddly bits into place.
(You'll also notice I sprayed on a layer of filler primer onto the crossguard)


I need to make a hole in the center of the crossguard to accept the threaded rod. Unfortunately I hadn't planned for this as I thought I was going to use the hollow crossguard. If I had known, I would have left out the center ribs and filled the cavity with milliput, leaving a hole going straight the the center. Hindsight is a wonderful thing.
I ended up having to carve away the styrene and foam which was no easy task. I filled the gap with milliput leaving a hole going straight the center for the threaded rod.

Time consuming work, but had to be done.

The next thing to do was attach the guard to the blade. I found that threading the guard all the way down to the blade wasn't practical as I only had 5 minuet epoxy glue which would have set before I got the guard down to the blade. I decided that I'd fill in the threads with milliput (not shown in pictures) and make the hole in the guard a little bigger. This way the guard slid right down the rod and onto the blade. I didn't just want to rely on the glue so I inserted some 2mm rods into the top of the blade which slotted into some holes I drilled in the guard. This would prevent the guard from twisting around the circular rod. I applied glue to the main rod, smaller rods and top of the blade and waited for it to dry.


The arches of the guard were supposed to sit inside the hollow corssguard, however mine is solid and so the arches needed to be trimmed. This was done before I glued it on to the steel rod, but unfortunately I don't have any pictures.

Now it's time to attach the crossguard to the guard. Unfortunately it didn't sit quite right on top of the guard. To remedy this I attached four pieces of sandpaper to the crossguard and then twisted it back and forth ontop of the arches until it sat flush.


To transition the blade into the guard I first cut out the twiddly detail in Styrene. This part covers both the guard and the blade. I then Filled in the shape with Milliput. Unfortunately I don't have too many pictures of this process.

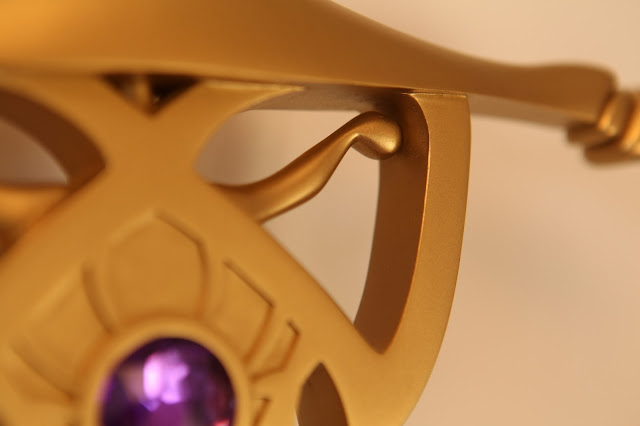
This is a picture of the sword at a later stage, but it illustrates how the milliput and styrene were used to transition between the blade and the guard. (Hopefully)

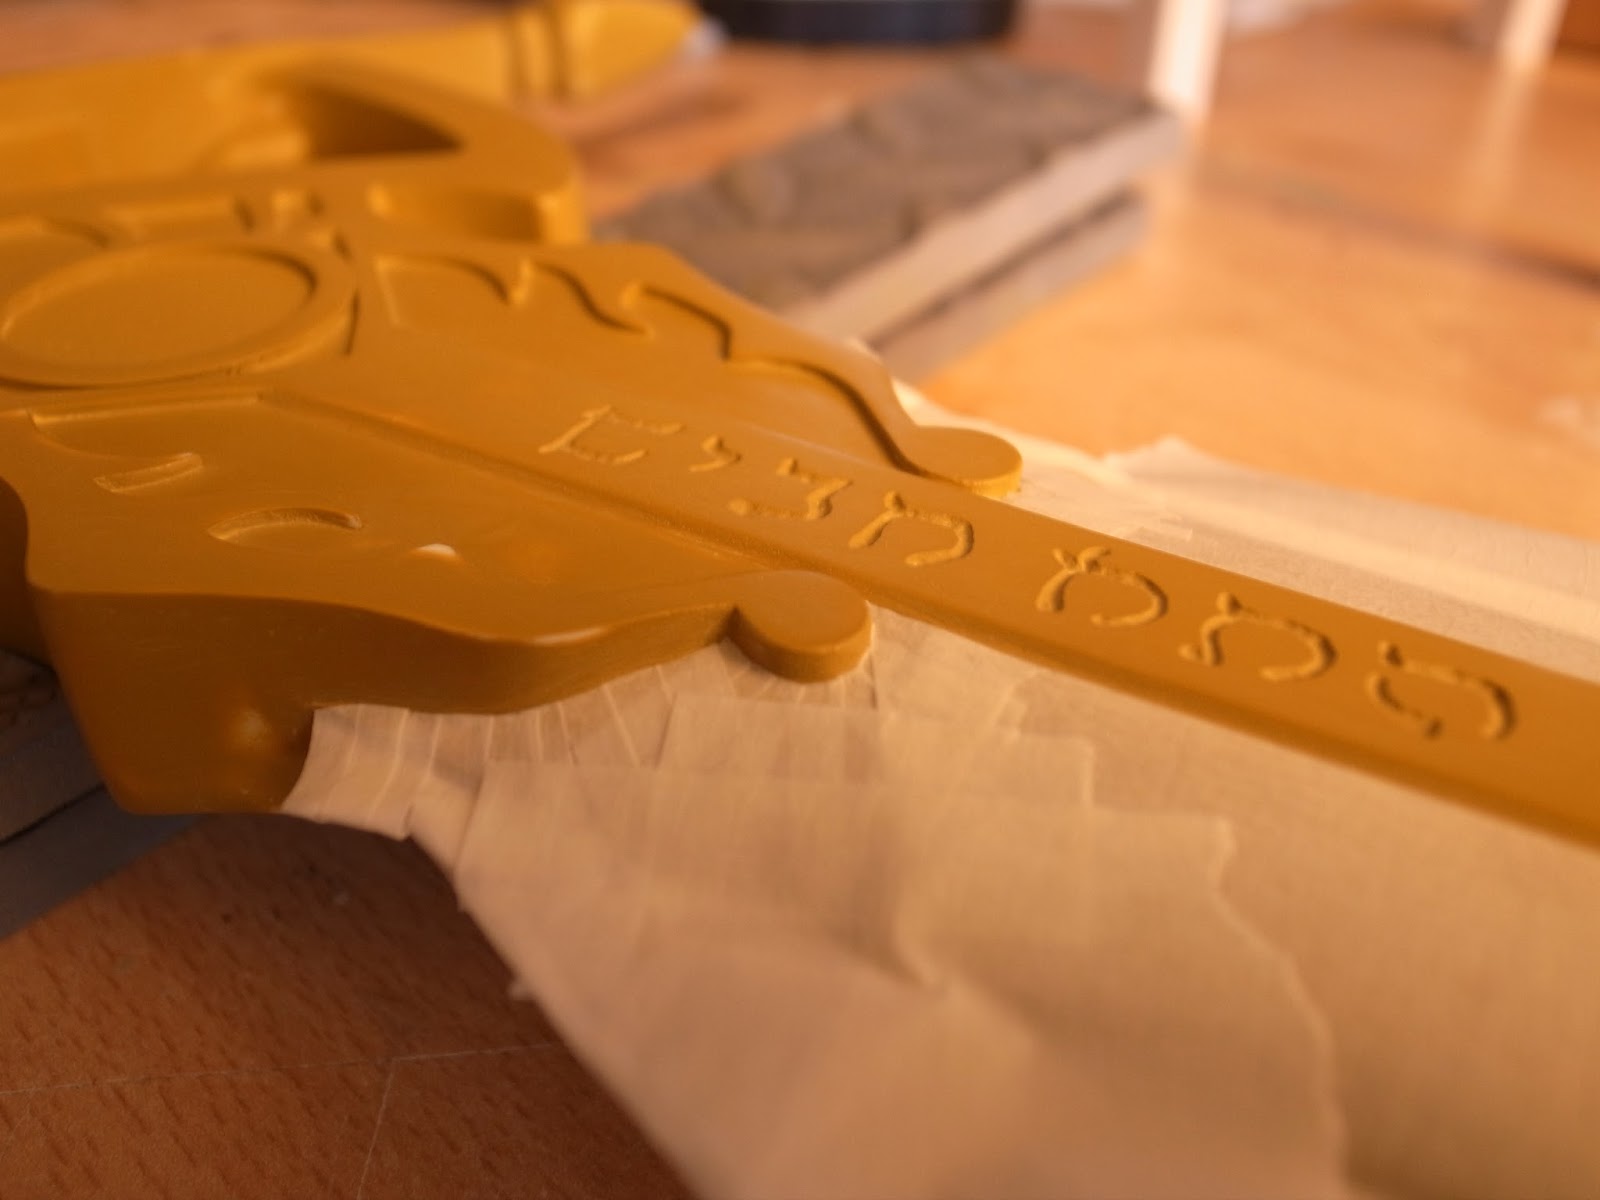
Next was the engraved strip down the center of the blade.
I was originally going to use styrene for this and carve out the Hebrew letters with my dremel, however Styrene is a very hard material and carving out the tiny characters proved to be very difficult. They ended up looking very squiggly and keeping the dremel at a steady depth was very tricky.
I decided to use foamed PVC instead. This material is much softer and I was able to use a sculpting tool to engrave the characters by pushing it into the surface.
The edges of the strips were angled so I made a jig for my scalpel that allowed me to make a continuous angled cut.


I printed out the characters onto some paper and then traced around them with a needle ontop of the foamed pvc stip.

I then followed the dotted lines with a ball ended sculpting tool and engraved/indented the material.


Because the material is so soft and easy to engrave, it also means it's very susceptible to marks and gashes; you can push your fingernail into the material and it will leave a huge mark. To combat this I painted 3 layers of PVA glue onto the surface, which I then lightly sanded to get rid of the bumpy brush texture. This created a hard shell over the surface of the strip.
This method works quite well, however the PVA didn't stick to the foamed PVC too well.. I'm not sure if this was because the glue I was using was REALLY old or weather the type of glue isn't compatible with the pvc.. I've read about quite a few people who have used the two together with no problems. I used super glue to seal the areas that were peeling up and then sanded this down smooth.
A CNC machine would have been the best thing to use for this as it would have had no problem accurately carving out the characters in styrene,, but hey ho.

Next up were the handles! I was pretty excited about making these as I had a cool idea for the purple grips I wanted to try out. I also love whittling!
I started by cutting a wooden curtain pole into two 13cm lengths. The hardest part of this process was drilling the holes that go straight through center of the handles. I tried experimenting with a few drill press-like jigs, however they were never that accurate. Instead I used what I've called the "Step-it-up-method". I have a range of drill bit sizes from 1mm all the way up to 1cm. I marked the center on each end of the dowels and started with the 1mm drill bit, I drilled halfway though the dowel then turned it over and drilled from the other end. I repeated this process gradually raising the size of the drill bit until I hit 8mm. I also had the dowel clamped at a perfect 90degree angle which helped me to line up the drill.


Voila!


Voila!

Now onto shaping the handles. I used a compass to draw out some circles that were the size I wanted the ends of the handles to be. I stuck the circles onto the ends with some double sided sticky tape and then started whittling down the shape. I'd lost my pen knife so I had to use a scalpel, Arrrgh!


I then sanded the shape smooth.

Two handles!

The handles have a purple grip texture (not shown in my original designs) look here for reference. Originally I was going to try and use a lathe to carve out the coil shapes, but I didn't have any lathe tools at the time, so decided to use a different method.
Instead I bought some 2mm purple wire from ebay. I covered the handles in double sided sticky tape and drilled a hole at one end of both dowels. I then capped off the ends with styrene disks, this would stop the wire coming of the end of the handle. I then inserted one end of the wire into the hole and glued it in place with epoxy. Once the glue was dry I began to (very, very) tightly wind the wire around the handle. The tape was just there to help stop the wire unwinding while I was doing this. Once I got to the end, I drilled another hole for the wire to go though, before pushing it though the hole I applied glue around the end of the handle.

I trimmed off the styrene disks so they sat flush with the wire. I also filled in the area where the wire couldn't reach with a thin string of milliput. I then colored this with some sharpies so it blended with the wire (I ended up using a combination of cherry and deep purple to get them to match)


I also colored the ends of the handle with the sharpies. (not shown here)


Now I needed to make the twiddly bit which goes between the two handles (I feel like I'm over using the word "twiddly" in this post!?)
I was going to lathe this part, but couldn't due to the reason aforementioned. I needed the shapes to be symmetrical and perfectly round. I did think of sculpting the shape, but I decided it would take too long and (due to my sculpting skills) would't be symmetrical enough.
Instead I decided to hit the charity shops.
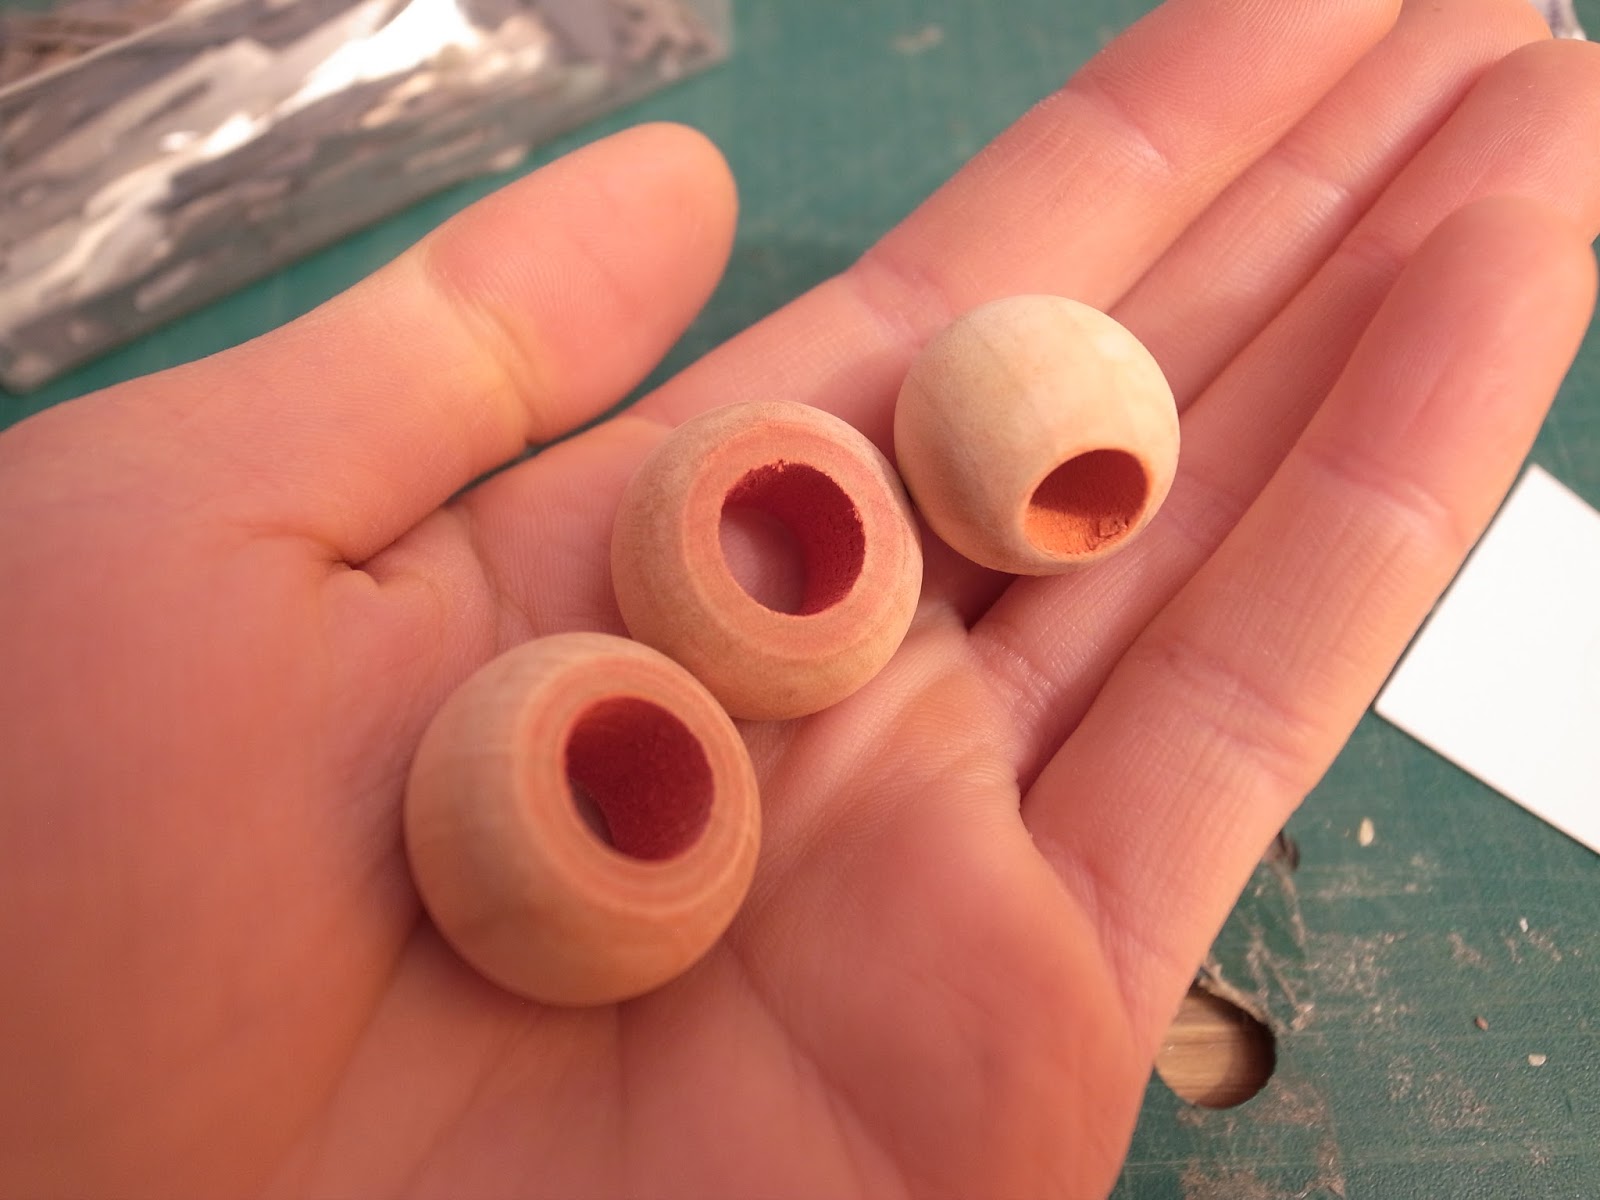
I found a baby cube toy thingy which had a bunch a beads on it that were the exact size I wanted.
I found a baby cube toy thingy which had a bunch a beads on it that were the exact size I wanted.
There were some larger, disk beads on one side and some smaller circular beads on the other, perfect!

I dismantled the cube and retrieved the beads I needed. They were covered in a a crap tonne of varnish and brightly colored paint which I sanded off.

I then glued them all together with super glue (probably should have used epoxy, but I didn't want to wait). The hole in the beads were also too large so I filled it in with milliput to make it the right size

I'd been dying to try out 3D printing since I first read about the magical machines so I decided to use the star at the top of the sword as an excuse. I used Fusion 360 to model my star, find the file here.
Unfortunately I don't have a 3D printer, but I DID find this amazing site called 3D Hubs.
Their site enables anyone who owns a 3D printer to make a page and offer printing services. You upload your file, select a material, and then choose a local manufacturer you'd like to work with.
From their site:
"With 3D printing, the factories of the future could become community-run micro-operations. Products could be made on-demand and closer to their point of purchase, with individuals and companies alike driving their design and innovation. Making and distributing stuff would not only be cheaper and better for the environment, but great for local economies as well. All we would need is a supportive infrastructure that allows us to tap into this production network when and where we need it. We’re on a mission to make this infrastructure a reality."
The file was sent and within two days I had the print in my hand.
Brilliant!


I sanded and primed the star then attached one of the beads from the baby cube to form a base.

After this I primed and sanded the hilt, crossguard and blade many, many, many, many more times. The surface had to be super smooth otherwise the metallic paint looks absolutely awful.

The material inside the disk didn't need to be smooth as the gem will be covering this area.

I was initially just going to dry sand the whole thing, but it just wasn't getting the surface smooth enough so I decided to order some wet sandpaper. I worked my way up the grits until I got to 2500. It was pretty shiny at this point!

Time for Paint! I masked off the blade with masking tape and sprayed on around 5 coats of Rust-Oleum Elegant Finish Gold. Harrison Krix (a.k.a the prop making god) wrote a book on Painting and Weathering which is a fantastic resource. A lot of people underestimate the value of a good paintjob - it can make or break a prop and it's definitely work researching techniques before you even touch a spray can/paintbrush.
I would definitely reccomend Rust-Oleum's line of spray paints. I've used many other metallic spray paints and this is the only one which actually looks metallic. I'll never use another sort - not after the Great Blade Painting Disaster of 2017! - read on...

Here's the gold paint finished! Always take your time with masking, it's worth it!


Now it's time to paint the blade. I had bought some PlastiKote metallic spray paint a while back for another prop and decided that I'd use it instead of my favourite Rust-Oleum spray paint - mainly because I didn't have that much more budget to spend on the prop.
Volpin Prop's (Harrison Krix's)
Two Commandments of Spray Painting:
1: Test First
2: Read, Read, Read (The Label and instructions on the back)
Unfortunately I neglected the first one. I got a little trigger happy with the ol' spray paint and decided to paint the blade before testing.
I knew that PlastiKote is far less superior in quality to RustOelum and the results with this paint can vary drastically. The paint seems to be much more affected by the temperature of the air, this is not very useful when ya live in a cold environment. I did warm the paint up in a bucket of hot water before spraying, but unfortunately that didn't help.
I masked of the guard and crossguard and sprayed about 5 layers of paint onto the blade. After the first layer, I knew the finish wasn't going to look anything like metal. It was very speckled and dried in strange patches. I kept spraying on the coats, wishfully thinking that another coat might miraculously fix the horrible texture/finish that was forming on my beautifully sanded and smooth blade. It did not.
Once I'd let it dry for 24hrs things didn't get any better - as well as the finish looking more like a rough stone than shiny metal, it also smudged really easily. I was pretty annoyed at this point and one tends to engage in irrational activity when in this state. I decided that painting a layer of acrylic gloss medium might help seal the paint and give it some shine(?).. this didn't work and It started to peal off.. not surprisingly.
I finally decided to walk away and take a break - usually the best course of action in these sort of situations.


HA! Five minuets later I came back and started to frantically sand off ALL the paint. I should have waited until the morning, but anger is kinda useful when you have 9+ hours of sanding ahead of you, it speeds up the process quite significantly.

 Some picture of the sanding mid process.
One side sanded, One still to go.

And here is the blade re-painted with my beloved Rust-Oleum Siver spray paint! (after waiting a week for it to come in the post)
Smooth and shiny. Yay!

The last thing to do was glue the handles, twiddly bit and star onto the steel rod! Again, I ended up filling in the threads with milliput and then using epoxy to glue them on. I also glued the gems on with epoxy.

The End!
I hope you enjoyed this post and you haven't fallen asleep yet. I feel like these posts are getting longer and longer, but there's just so much to write about!
Please post any tips/tricks that you'd like to share down in the comments section!
I'd love to read them :)
We're just starting to move house so I won't have much time/a workshop to make stuff. Hopefully I'll be able to fit in some little projects here and there.
Until Next Time!
Also.. I've just started reading David Tremont's book on model Making which is SO awesome.
Check it out here.
Thanks!
Waw I'm really impressed! I like how you managed to build the gard from scratch, and it looks pretty flawless in the end. And also thanks for the links, and for sharing the progress, as always =)
ReplyDeleteThank you so much! I'm super glad you found the links useful ;)
DeleteBy the way, have you ever tried thermoforming stuff out of sheets of plastic? I saw people make cockpit windows for model jet planes that way, but I never managed to do it myself.
DeleteI have tried heating up styrene with my heat gun, then trying to shape it over a buck, but it never works to well. My dream would be to have a Vacuum Form machine.. I may end up making one as I've found some really cool tutorials on how to make one. Here's some links If you'd like to check them out :)
Deletehttp://blindsquirrelprops.com/supplies-vacuum-forming-machine/
http://volpinprops.blogspot.co.uk/2010/06/budget-build-mini-vacuum-former.html
http://www.tk560.com/vactable4.html
All the best,
Evie
Excellent post with a great balance of useful information and clear explanation. The content is engaging, informative, and presented in a way that keeps the reader interested from beginning to end. It is always refreshing to come across such high-quality writing that offers real value. Thank you for sharing this outstanding article.Excellent post with a great balance of useful information and clear explanation. The content is engaging, informative, and presented in a way that keeps the reader interested from beginning to end. It is always refreshing to come across such high-quality writing that offers real value. Thank you for sharing this outstanding article.
ReplyDeleteEnrgtech
Hacksaw Blade
A very informative and well-structured article. The content is clear, engaging, and full of useful insights. Great work on making the topic easy to understand and valuable for readers.
ReplyDeleteEnrgtech
Scalpel Blade