


Hello There!
So the time has arrived! Creating the creature suit has taught me so many new skills and I can't wait to share them with you guys!
I'd first like to share some links to some sites which I found very helpful during the construction process:
Tested.com - Rancor Suit Build -
https://www.youtube.com/watch?v=05XBEM91Whg
The people over at tested are absolutely awesome, they are a fantastic resource for makers and have videos on all kinds of making-related stuff! In this video Frank Ipollito makes a rancor suit and they film the whole process (In four parts). This video is what inspired me to make my creature suit!
Jim Henson's Creature Shop Challange
http://www.imdb.com/title/tt3275212/
This TV program is one of my favorite shows, in each episode the contestants compete to make the best creature. The range of skills that the contestants have is incredible and I learnt so much from just watching how they work. If you are looking for inspiration this is a great place to find it!
Stan Winston's School of Character Arts - How to Make a Foam Dinosaur, Ted Haines
Ted Haines is the MASTER when it comes to foam fabrication and in this video series he shows you how to create a foam dinosaur head, he covers creature design, patterning, blowing up you patterns to the correct scale, transferring patterns, info on what foams to use, what glue to use, how to attach all the pieces together, adding details & texture, sealing foam, painting the foam and much much more! You can get a free 3 day trial and have access to all the videos on the site. They have videos on so many subjects and it's definitely worth considering buying a subscription :) Also, if you are a student they offer a 40% discount!! Link to info on discount: https://www.stanwinstonschool.com/landing_pages/40-off-subscriptions-student-discount-offer
Alright, now here's how I made my creature suit!
So the first thing to do was choose what creature I would be making. I have always had a fascination with the Tolkien universe and especially love the trolls which appear in the books. I began researching different troll designs and printed tonnes of images off to stick on my wall.
After I decided on a subject, I started creating a 1:10 scale figure of my proportions, I am going to use this as the base to sculpt the body of my troll on top of. I'll be acting in the suit so I need to make sure I fit into it ;).

I attached the scale figure to a base as it will be easier to sculpt on :)

I used Super Sculpey to sculpt the troll's body. I kept the design simple as I will be replicating the sculpt in foam.


After I had finished the sculpt, I started to cover the leg with masking tape, I first baked the whole thing in the oven as the masking tape would not stick to the oily clay :) I cut little strips of masking tape and went over the whole leg, keeping the masking tape going in the same direction. I then went over with a second layer, but this time laying the tape in the opposite direction. The layering helps the masking tape keep it's shape once it's been taken off the sculpture. I only patterned one side as I can just reverse the pattern pieces for the other leg.

I then took a fine black pen and marked out the pattern for the leg. I numbered all the pieces and also gave all the seams a letter, this makes it much easier to match up all the pieces when they have been taken off the sculpture and blown up to the correct scale.


Here are all the leg pattern pieces, I used a scalpel to cut them off the leg. I cut darts in the pieces which would not lay flat.

I used the scanner on my printer (Does anyone have the issue where your printer won't scan unless it has ink cartridges?! Make sure you order some ink before hand if you printer is as annoying as mine!)
After the pattern pieces had been scanned I took them into Photoshop and and scaled them up to 8 times their original size. I printed them out on A3 paper and cut them out using a scalpel.

A bit on glues: I decided to use hot glue to glue my creature suit together, now this may seem crazy however there was some method to my madness. I could have used contact cement (Barge cement seems to be the go-to contact adhesive in the US), however the glue is extremely toxic and is best used out side or in a well ventilated area. Unfortunately I could not work outside as the Scottish weather is just too darn cold and rainy! Contact cement is also pretty pricey over here in the UK and I was going to need large quantities of the stuff. Hot glue worked really well for me, however there definitely are some drawbacks. You do have to wait for the hot glue to cool down before you can relieve the pressure on the two seams you are joining. The bond is also not as strong as the bond you would get with contact adhesive. I ended up using about 100glue sticks to glue my creature suit together, fortunately ebay sells tones of extremely cheap glue sticks!
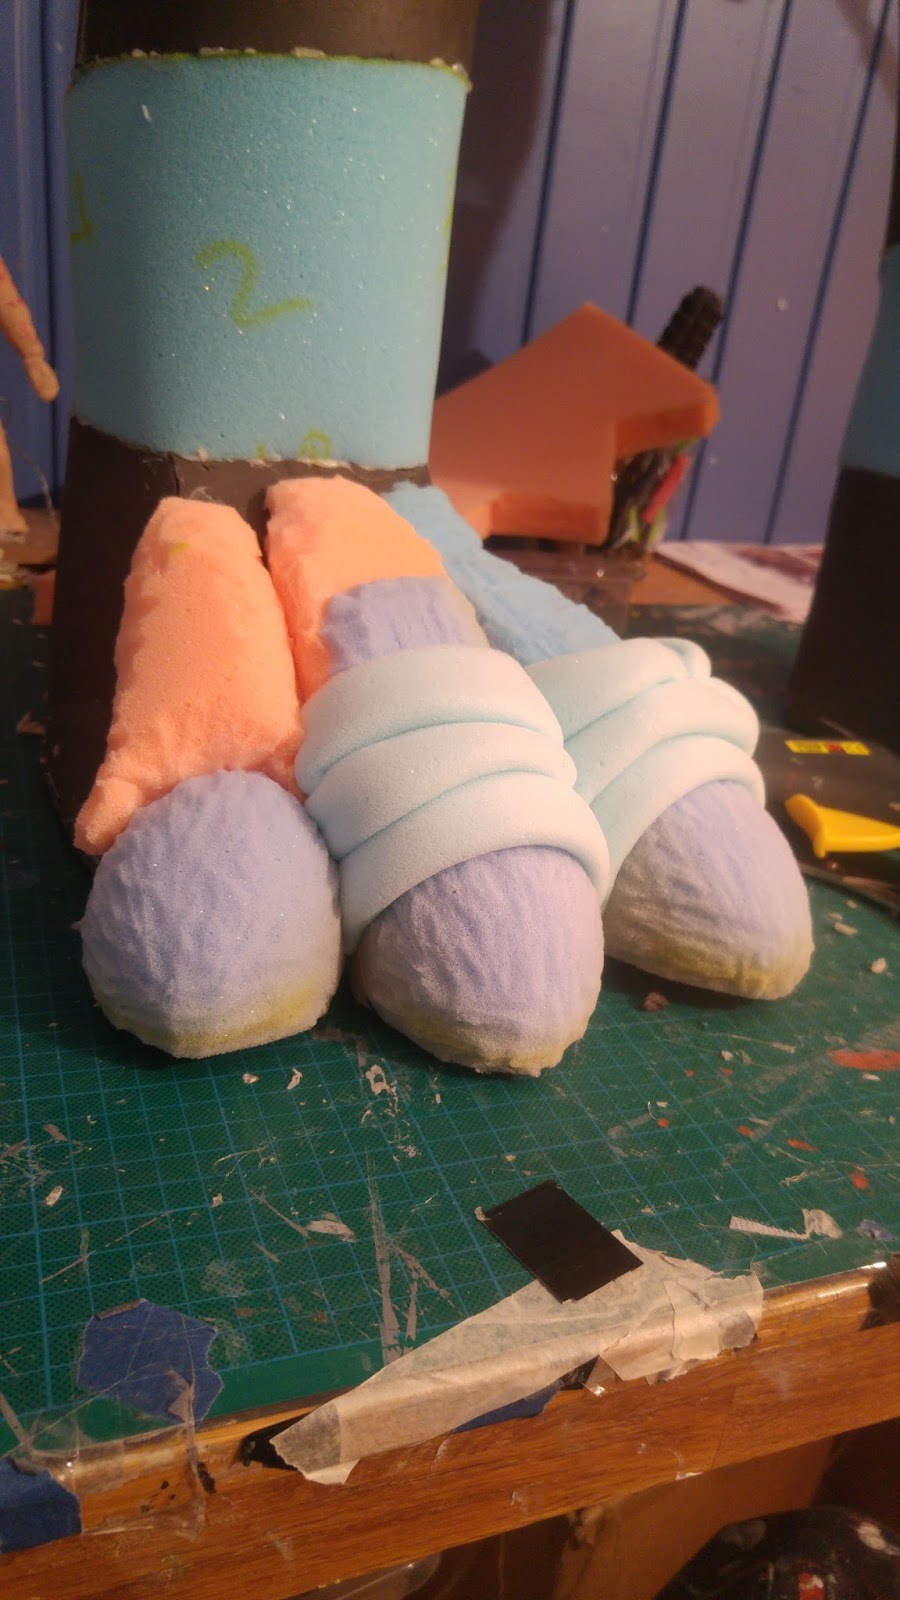
I transferred the pattern pieces to foam and cut them out. I used the 10mm eva foam floor mats, this is the same material as the L200 foam that is prized in the foam fabrication world. The drawbacks with the floor mats is that they have a bumpy texture on one side and also the quiality/density of the foam can vary depending on which supplier it came from. The good news though is that they are very cheap as they are mass produced, yay! I used upholstery foam (high density) to create the joints in the creature suit. You can also find this very cheap, I bought mine from ebay.

This is the bottom part of the leg with the beginnings of the knee joint. Unfortunately I first bought some upholstery foam that was too thick and had to thin it down (see orange foam in picture), it ended up being to floppy and I had to buy some thinner, denser upholstery foam.

This is the first try out with the leg joint!
I did have the pattern pieces for the foot taken from sculpture however the complicated shape didn't translate too well when it was blown up to full scale. Instead I made a full scale mock up of the foot using paper and foil. I scrunched up the paper into balls and built them up until I had a good general shape, then refined the shape with foil. I then covered the whole thing with masking tape and drew on where I wanted the pattern pieces to go.

I cut the pieces out then transferred them to paper.

..Transferring the patterns to foam

I needed to attach a shoe to the bottom of the creatures foot so I will be able to control the foot when I'm wearing the creature suit. I used contact adhesive (outisde) to glue the shoe down then sewed through the shoe and the foam to make extra sure it wouldn't come off (Most definitely over kill methinks!)


Here are the two legs! The blue foam is the denser foam, I ended up changing all the orange stuff to the blue foam :) All the seams are glued together with hot glue. I ended up modifying a lot of the pattern pieces as a lot of them didn't line up. This was the first foam fabrication I had ever done and this process taught me a lot about how the materials and processes work. The body worked out much better and I didn't have to modify the pattern pieces much at all.


Here are the two legs attached together :)


Starting to pattern the body! This is the first layer of masking tape, I think I did 3 in total :) Again, I only needed to pattern one side as I will just reverse the pattern pieces for the opposite side.


Pattern pieces marked out, numbered and lettered!


In the process of cutting them off the sculpture :)

Here are all the body pattern pieces, I traced them onto a piece of paper, remember to transfer all the numbers and letters onto the paper as well!

The first thing I created were the arms, again I used the blue upholstery foam for the joints and the stiff eva foam for the parts that don't need to move as much.

Here are some in progress pictures of the body :)


I used LOTS of scalpel blades while doing this! Foam blunts the blades very quickly!

Attached the arms to the body :)

I wanted the hands to look like human hands, so I began by tracing my hand then blowing it up to what looked like the correct scale for the creature suit. I cut it out from card then stuck it to some cardboard.

I covered this with foil until I was happy with the shape.

I covered this with masking tape..

I then covered this with another layer of stronger tape. I drew the pattern pieces onto the hand then cut them all out.

Here are the pattern pieces drawn onto some 6mm upholstery foam. I had bought the 6mm foam to cover the creature suit in, however it ended up being too thick, more on that later :)

Progress pics of hand :)


Finished Hands!

I began working on refining the shape for the feet. I had to shorten their length so the nails would fit.

I sculpted the nails from some 2" upholstery foam. I had some of the foam left over from a puppet project I had done was I was 8 years old! It was pretty tattered, but was perfect for my needs. I added some extra bits of foam to create the individual toes.

I used the 6mm foam to create a skin like texture


As I had said earlier, I had planned to use 6mm upholstery foam to cover the creature suit. I'd seen Ted Haines use this technique in his T-rex building video, however he was using foam that was about 3mm thick which I could not find in the UK (let me know if you know of a supplier!). The 6mm stuff was far too thick and created skin rolls that were far too big. I decided to use calico instead, it's a cheaper, lighter material than canvas. It worked well for my needs, but i'll definitely be experimenting with different techniques in the future.
I started to cover the creature suit with the calico. I was experimenting with adding muscle shapes under the fabric, I really quite liked the effect, but unfortunately I was running out of foam and budgetary constraints meant that I could not purchase any more. The muscle method used more calico than the simpler method too.

I used spray contact adhesive to glue down the calico. I considered using latex glue (copydex is a good brand in the uk) however the ammonia they use in latex is really toxic and latex is also much more expensive than the spray adhesive. I used the glue outside and with a respirator :) Protect those lungs!
I had to glue the calico down in sections, there are 4 sections to the leg then 2 for the crotch, 4 for the feet and then two more for the tail. I made the seam start and end on the inside of the leg, to help hide it and I also tried to continue all the wrinkles across the seam line.


I used electrical tape to mark out the pattern for the hands.


I took the tape off then transferred it to the calico


For the tops of the fingers I cut out calico circles and then stretched them over the finger tops.


Onto Sculpting/Molding/Casting the head!
I had never really sculpted anything before embarking on this project so I did lots and lots of research to make sure I had the best chance of getting it right! The Stan Winston School has an incredible video showing you how to make a latex mask covering the sculpting, molding and casting process. It was such a helpful resource and If you are starting from zero like me it's a great video to watch to get you started :)
So I used WED clay to sculpt my head, WED clay was developed by Disney (WED = Walter Elias Disney). It's similar to water based clay, but it has some extra oils added to stop it drying out so fast. It was developed by Disney because they needed a longer lasting, cheap clay they could use to sculpt their huge Disney related theme park dispalys.
I struggled to find a cheap supplier of WED clay here in the UK. You can buy it from this site fairly cheaply, but if you are only buying a small amount, it's not worth paying the extortionate shipping price :( I decided to buy one 11.3kg packet from the 4D model shop.
I first sculpted the general shape I wanted for the head with scrunched up paper and foil. There are a couple of reasons why I did this: 1) I'm not an experienced sculptor and I felt that It would be easier for me to reach the initial shape/forms 2) I wound't have to worry about the clay drying out while I was fiddling with the forms. 3) And it uses much less clay than if you were starting from scratch, I definitely wouldn't have had enough clay if I hadn't used the foil/paper under structure.
I also made a timber structure to hold up the head while I was sculpting. I measured the circumference of the neck opening on the creature suit and cut it out in plywood, I attached this to the arm you can see poking out of the head. This was attached to a vertical post which was supported by a brace and also attached to a board at the bottom.

After I had obtained a shape I was happy with, I covered the whole thing with a couple of layers of masking tape. This allowed me to see the shapes much better and alter any that I didn't like.


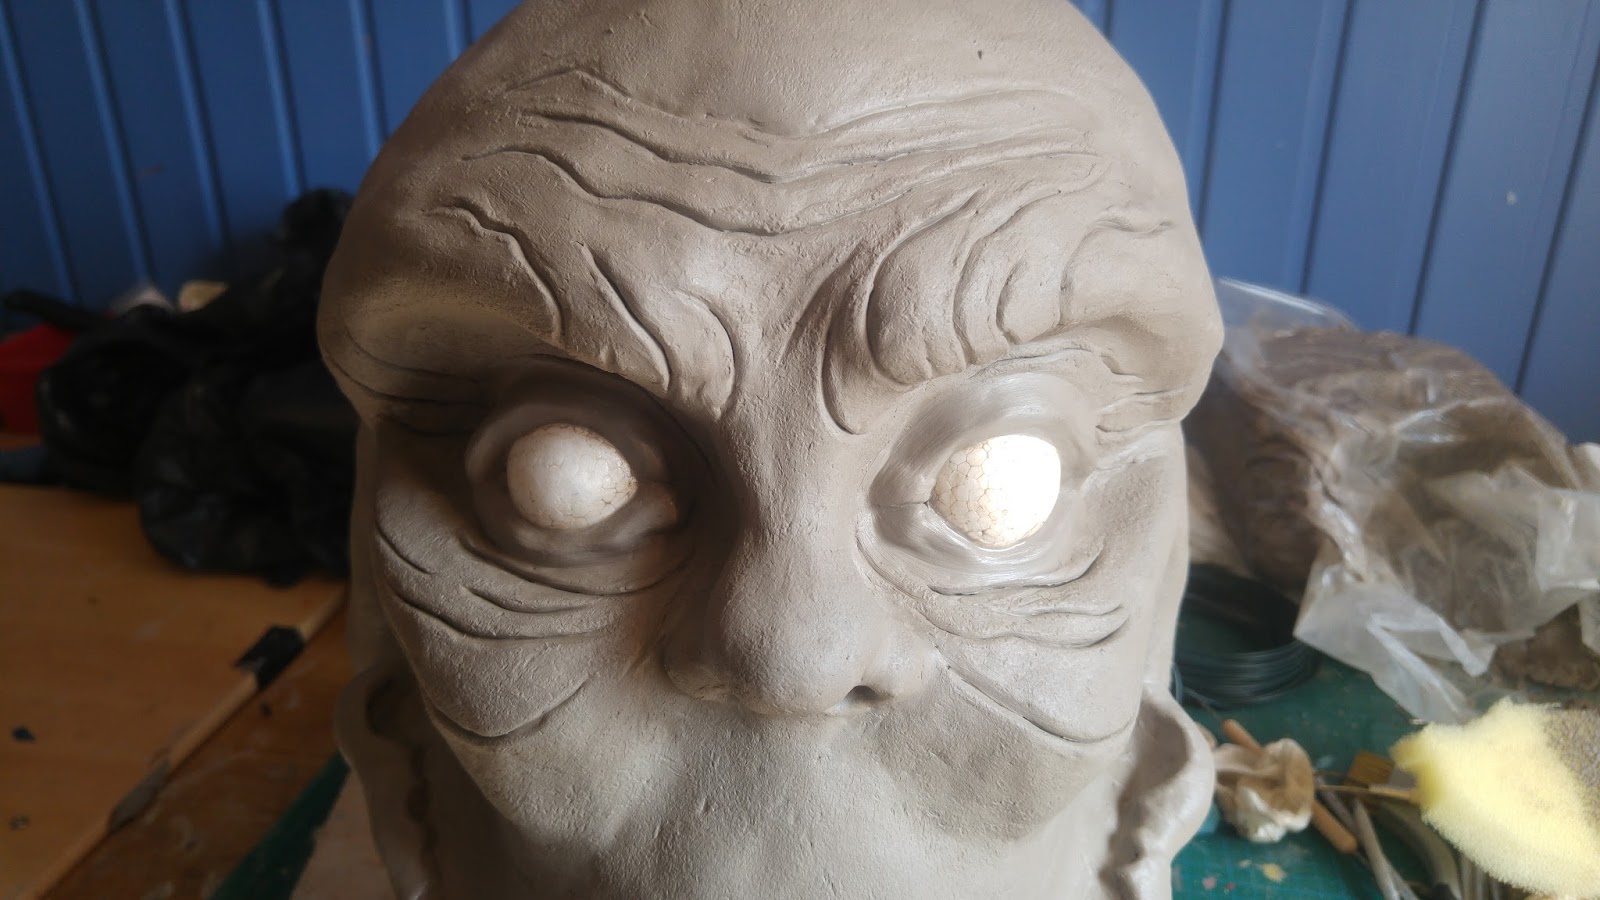
Starting to add clay! I used polystyrene balls I found at Poundland for the eyes.


I wanted it to look like the teeth were pushing against the lip so I sculpted the lip around the teeth.


It took the teeth back in and out to refine the lip shape and make sure the edges were all rounded. I molded the head without the teeth as I am going to sculpt them later with super sculpey.

I used a flannel and pressed it into the clay to achieve a bumpy skin like texture.

Starting the moudling process! I started by creating the mould wall, I used a cheaper water based clay for this as it sticks less well to the WED clay and is easier to remove. I sprayed the whole thing with about three coats of Plasti Kote Clear Sealer. This was definitely a bad choice! I used it to help prevent the clay from sticking to the clay head, however it made the clay nigh on waterproof which made the first layer of plaster so hard to apply. Most of it ran off the sculpture creating a huge mess! I did buy some dulling spray to spray over the Plasti Kote as this would have given the surface a bit more tooth and surface tension. This however came two weeks after I had finished making the mold and I didn't want to wait that long! Don't skip out on this step! It will save you many headaches :)


I used Crystacal R plaster from MB Fibreglass for making the mould, It's similar to the Hydrocal they use over in the US. I covered the sculpture with 3 coats of this, dripping and brushing into all the cracks and crevices


I then started the burlap layers, I saturated pieces of burlap with the plaster then squeegeed (is this a word?!) most of the plaster back into the bucket. I made a new batch of plaster for each new layer of burlap, I did about 8 layers in total.


Once I had finished one side of the mold I turned the whole thing around and started clearing up the mold wall, look how terrible my mould wall is! Sorry to any mould maker out there, this is not a pretty sight.


Again, this was my first ever mould and I have learnt so much from my mistakes. I should have splashed the plaster all along the mould wall while I was doing the first coats, this would have prevented all the gaps and horrible holes that are in the wall.

I cleaned up the mold wall, yay! I used extra plaster to fill in the holes and sanded and scraped the whole thing until it was smooth!

I laid the head on its side to make it easier for me to mould the other side

I made a clay wall around the edge of the wall to prevent the plaster dripping of the sides. I also created pry points with the clay. I also slavered the whole mould wall with A LOT of Vaseline, this will stop the two halves bonding together. Try not to get any on your sculpture as the latex won't be able to stick to it.

1st plaster beauty coat applied!

Be prepared to create a huge mess while making a mould! It took a lot of scrubbing to get all the plaster out my floor!

The second half of the mould finished!

After a day of hardcore mould making I left the mould over night to set
Prying open the mould! It came apart fairly easily thankfully.


But damn, this guy needs to moisturize!

Next begins the long process of clearing out the mould. I used a tongue depressor to pick out the main chunks (don't use any metal tools as this will scrape and ruin you sculpture). I sprayed the mould with water to loosen the clay, then used sponges, brushes and kitchen roll to clear the rest out.


Oooh a lovely clean mould!
I filled in any bubbles/imperfections with milliput and left to it to set.

The next step was to join the two mould halves back together. They didn't quite line up, I used Milliput clay to fill in the gaps and re-textured it with a flannel to help it blend in with the rest of the sculpture.

Now for the casting! (and time for me to look like a deranged miner). I used the flashlight to see inside the mould when I was brushing in the latex and the respirator to stop me breathing in the ammonia fumes.

I cast the mask in my hallway with the front door open to stop the fumes getting trapped in the house. I used ratchet straps to keep the mould together. Don't skimp out on the ratchet straps! I bought some cheapo ones from ebay and the second one tore almost immediately! I had to use duct tape for the front of the mould instead.

I used brush on liquid latex from MB Fibreglass for casting the mask. I brushed on about 15 layers of latex, allowing each layer to dry before I added another. It was taking about 12 hours for each layer to dry (cold Scottish weather darn you!) so I tried using a house fan to speed things up, this helped so much! It took about 3/4hrs for each layer to dry with the fan :)

After all the latex has dried I wanted to fill the head with a layer of polyfoam (polyurethane foam). This would give the mask some structure and stop it flopping about all over the place. I bought some Poly Craft Polyfoam however discovered that the foam will not set correctly if the temprature is below a certain level. I tried some out in my garden, polyfoam is highly toxic so I definitely didn't want to use it in the house. The foam didn't really expand (like it's supposed to) and also remained tacky. I've read that it can still out gas toxic fumes when it's still in the tacky stage and so decided not to use polyfoam. The picture is of the work station I set up for trying out the polyfoam, unfortunately I didn't take any picture of the polyfoam I tired.

It took me a while to decide what I would use to strengthen the mask, but eventually decided I would use foil and duct tape (very low-tech, but I did not need the mask to stretch or move so it worked well in this instance). If the head was going to be used as a puppet I would definitely have found another way of doing it :)
I used spray glue and pushed the foil into all the crevices.

I could not get a good picture of the duct tape layers as it was too dark, but I taped about six layers of tape (each layer going in a different direction).


I first tried peeling the latex from the opening of the mould, then moved to prying the mould open very carefully, peeling and prying until the latex was loose. Definitely the worst part of making the mould!

...And we have a troll head!

The seam line is pretty bad due to the patching I had to do, however one does not learn without making mistakes and I have definitely learnt so much from making this latex head :)

For painting the mask I considered two options: Rubber Cement Paint and Acrylic paint mixed with latex.
Rubber Cement paint uses rubber cement mixed with oil paint and thinned to a pourable consistency with naphtha (or other suitable solvent). It’s a great paint to use on creature suits/masks as it stays flexible once dry. It is however very toxic and should be used with proper ventilation/respirators.
The other painting option would be to use latex mixed with acrylic. The paint would stay flexible once dry and although latex has ammonia in it, it would still be less toxic than using rubber cement paint. Latex dries much darker than it’s original color so you have to be very careful when mixing the paint. Latex is expensive and I would need to purchase a large amount to cover the whole creature suit.
I experimented with using acrylic paint by itself and it remained very flexible without using latex. Although it would definitely not be suitable for painting something that's going to stretch and bend, my creature's face doesn't need to. Just using the acrylic paint without the latex meant saving lots of money, so I decided to go for that option :)
I used Winsor and Newton's 500ml bottles of Galeria paint, It's high quality and is fairly cheap (If you buy it from Art Discount it's about £10 cheaper than most online stores :)) I only had enough in my budget to buy two tubs of paint, after a lot of umming and ahhing I decided to buy Burnt Umber & Raw Sienna.
I painted the body first as I wanted to make sure I had the painting style/colors correct before I moved onto the head.
Unfortunately I don't have any progress pics of the paint process, but let me talk you through it. I started by mixing the raw sienna with some burnt umber in about an 8:2 ratio. After the whole creature suit was covered with this, I highlighted all the wrinkles by painting them with the raw sienna (without any burnt umber mixed in). After I had done this I used the burnt umber to paint all the ares surround the wrinkles. Although I would have liked to have used more colors and given the paint job a bit more depth, I'm fairly happy with the way it turned out :).

To paint the head, I used all the same colors however I used a slightly different method. I started by covering the whole thing with a dark wash of Burnt Umber making sure to get the paint into all the wrinkles.

After this initial layer was done I mixed up the raw sienna and burnt umber (this time making it a little lighter as the wash had already made the skin quite dark). After this I used makeup sponges to dap on a layer of the raw sienna and a layer of burnt umber. I couldn't go too crazy with the paint job as the head need to match the body.

For joining the two halves together, I cut out and eva foam ring that matched the contours of the bottom half. I glued this to the top of the legs (with my trusty hot glue!). For the top half I stuck a strip of upholstery foam all the way along the bottom. I then placed the two together and cut the upholstery foam on the top half until it followed the contours of the bottom half. The bottom half was too wide so I threaded some wire through the eva foam ring to pull it in. I then glued velcro to both halves of the creature suit.


For making the teeth I used foil and super sculpey. I used the foil to create the general shape of the tooth then covered the foil with super sculpey to achieve the shape and texture I wanted.

I made sure that every tooth followed the lines of the lip, this took quite a while! I wanted the teeth to be very random and definitely not all the same size!

I made sure that all the teeth were sitting flush with the mask (This tooth is not done yet), as this would give me more gluing surface and also makes it look like the teeth are actually attached to his face rather than just floating ;)


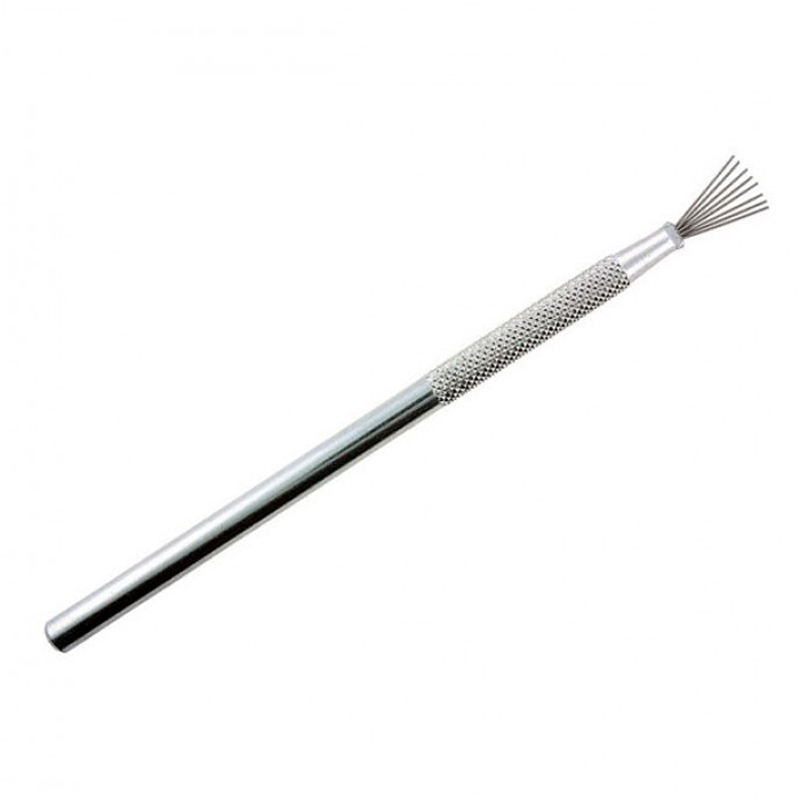
Unfortunately I don't have pictures of the texturing process, but I used a steel sculpting tool (exactly the one you see in the picture). I scraped the super sculpey vertically down the whole tooth, unitl there were scratch marks the whole way round. This brought up a lot of tiny bits of super sculpey, but I just used a brush to brush them off :)
Here are the teeth ready to go in the oven! I baked them for about 10min.

For painting the teeth (I made an extra one so I could try out different techniques without ruining the actual ones) I gave them all a base coat of creamy ivory. I then gave them a wash of burnt umber and then wiped most of it off, leaving the dark paint in the cracks. I then went over this with a wash of raw sienna and also wiped most of this off.


So many teeth!!


Onto eye balls! I used ping pong balls for the eyes. I first figured out how much of the eye ball would be showing, I marked this out with a pencil then replaced this with tape, otherwise I would loose the line once I started painting.
I gave the eyeball a light wash pf pink all the way along the outside and marked where I wanted the iris with some blue tack.

I printed out an iris and painted it with some pouring medium (It dries clear and glossy). This dude has an awesome tutorial on how to make eyeballs!

The photos jump a few steps here. I glued the iris down to the ping pong ball, but as the ball is round and the iris is flat, it was very hard to make the iris stick without the paper wrinkling. To remedy this I took some super sculpey and pressed it onto the ping pong ball, this gave me a stamper which had the concave shape of the ping pong ball. I cooked this in the oven. I applied super glue to the ping pong ball then used the stamper to press the iris onto it, it applied even pressure to the whole piece of paper and the wrinkling was forever gone!
I then used red wool to create the veins in the eye, I used the pouring medium to stick them down, but PVA would have worked just as well. I then put the eyeball on a glass and poured pouring medium all over the eye, I gave it about 3 coats.


To make the eyelids I poured some of the latex I had left onto the underside of a metal box (about 1mm thick)

I cut the latex out and covered the top and bottom of the eye.

Here is a try out of one of the eye lids :)

I painted these with the same colors I used for the head.

I then applied them to the eyeball. The latex already had a tendency to stick to the ping pong ball so instead of running the risk of gluing the inside edges of the eyelids down, I just glued each end and the outside edges.


I cut the eye holes out of the head, then placed the eyeballs where I wanted them. I secured the location with a strip of gaffer tape, then used hot glue all around the eye to secure it in place.


To attach the head to the body I had to modify the neck a little bit. I had originally used upholstery form for the whole neck, but found that it was way to bendy. I replaced the top section with eva foam and it worked really well. I also added some eva strips to the inside of the creature suit at the top where the seams meet to make it stronger.

I wanted to give myself as much gluing surface as possible so I added some strips of gaffer tape which come out of the head.

I used spray glue to glue the head on. I applied the glue to the front of the neck first, then moved my way down. I tried doing it in a oner and it just got very messy!


And here is the hole which I will see out of! I also cut a tiny hole in the calico and painted very light around the area. The range is vision is not great, but I can see the floor when I'm in the suit which is good enough for me :).

And we are done! (Unfortunately don't have any pictures of applying calico to the neck)
If you have any questions at all please don't hesitate to get in touch! I'd also love some feedback on the things I could have done better :)
Thanks for reading!
No comments:
Post a Comment